 Where to Buy
Guide
Install the plugin, set up your stores, and put your recommendations on your site.
Install
- Download where-to-buy-x.y.z.zip from the latest release.
- In WordPress, go to Plugins → Add New → Upload Plugin, choose the zip and click Install Now, then Activate.
- Under Settings → Permalinks, choose anything except "Plain", so items get addresses like
yoursite.com/where-to-buy/item-name/.
You need PHP 8.1 or newer and WordPress 6.4 or newer. A Where to Buy menu appears in the WordPress admin, with All Items, Add Item, Categories, General Settings and Store Settings.
Set up stores
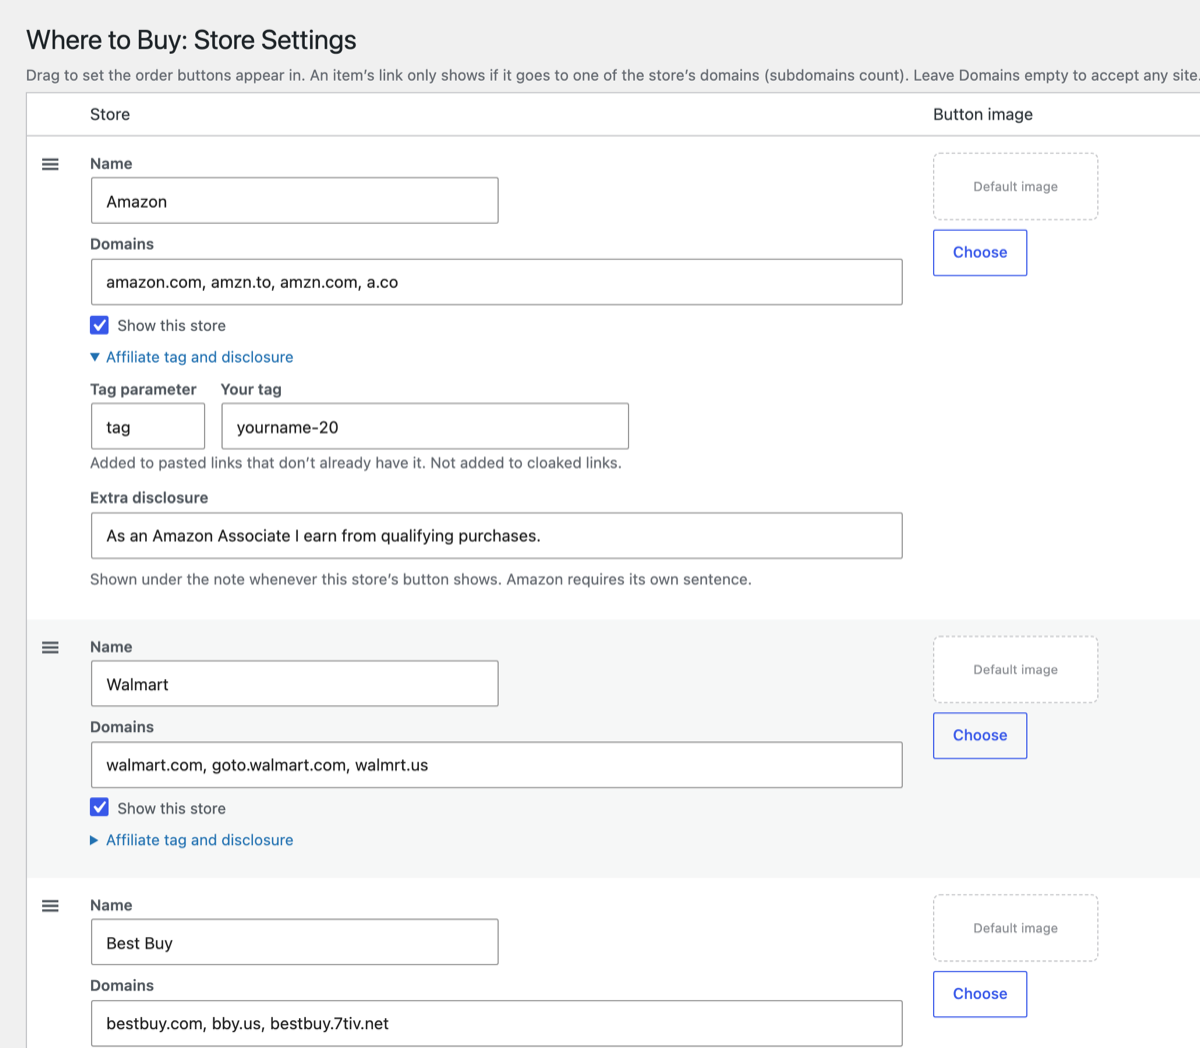
Open Where to Buy → Store Settings. Amazon, Walmart, Best Buy, Target and Chewy are there to start with. For each store you can set:
| Name | Shown on the button, or as the image's alternative text. |
|---|---|
| Domains | The sites the store's links may go to, separated by commas, such as amazon.com, amzn.to. Subdomains count, so amazon.com also covers www.amazon.com. If you use an affiliate network's tracking links, add its domain too. Leave it empty to accept any site. |
| Show this store | Untick to hide the store's buttons everywhere without losing any links. |
| Tag parameter and Your tag | Your affiliate tag, added to pasted links that don't already have one. For Amazon, the parameter is tag and your tag looks like yourname-20. |
| Extra disclosure | A sentence shown under the buttons whenever this store's button shows. Amazon's comes filled in. |
| Button image | A logo or picture for the button. Without one, the store uses the default image (below), or a text button if there's no default image either. |
Drag the handle on the left of a row to change the order buttons appear in. Add store adds a new row, and Remove deletes one. Renaming a store keeps the links you've already added to it.
The Default image at the bottom of the page is used, beside the store's name, for any store without its own image.
Store logos are trademarks. Check each store's brand guidelines before using its logo, or use text buttons.
General settings
| URL slug | The address of your items and list page. The default where-to-buy gives /where-to-buy/ for the list and /where-to-buy/item-name/ for each item. Changing it breaks links you've already shared. |
|---|---|
| Heading | The small heading above the store buttons. Empty hides it. |
| Disclosure note | Shown under the buttons whenever at least one button shows. The default is "Note: Commissions may be earned from the links above." |
| Links | Whether store links open in a new tab, and whether to Shorten Amazon links (on to start with). When you save an item, an Amazon product link copied from your browser, such as amazon.com/Atomic-Habits-Proven-Build-Break/dp/0735211299/ref=sr_1_1?crid=…&keywords=…&tag=yourname-20, is trimmed to amazon.com/dp/0735211299/?tag=yourname-20. The tag in the link is kept; if it has none, your Amazon tag from Store Settings is used. Other Amazon sites, such as amazon.co.uk, keep their own domain, and amzn.to and a.co links are followed to find the product. Links that aren't to one product, like search pages, are left as they are. |
| Item pages | Adds the buy box after the content on each item's page. Turn it off if your theme template places the buy box itself (see Theme templates). |
| Uninstall | Whether deleting the plugin also deletes your items and settings. |
Add an item
- Go to Where to Buy → Add Item.
- Enter the item's name as the title.
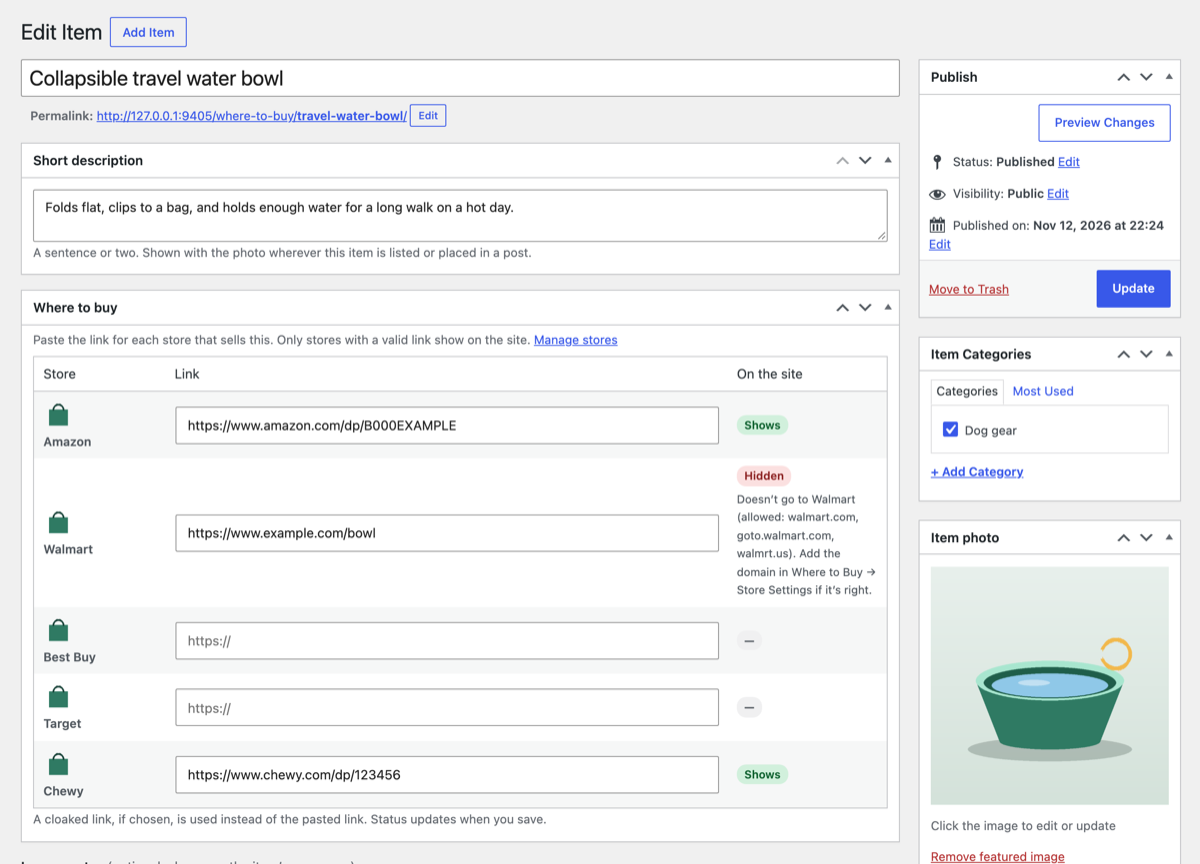
- Write a sentence or two in Short description. It's shown with the photo wherever the item appears.
- In Where to buy, paste the product link for each store that sells it. Leave the others empty.
- Set the Item photo in the sidebar, and choose categories if you use them.
- Optionally, write longer notes in the editor below. They appear on the item's own page.
- Click Publish. Each store row now says Shows or Hidden, with the reason.
Use your own photos. Amazon's Associates agreement doesn't allow downloading its product images and hosting them on your site.
Which links show
A store's button shows only when all of these are true:
- the store is switched on in Store Settings,
- the item has a link for it,
- the link is a full web address starting with
https://(orhttp://), - the link goes to one of the store's domains, or the store has no domains set,
- for a cloaked link, the cloaked link is published and the cloaker hasn't marked its offer as ended.
If no button shows, the item's buy box, including the disclosure note, is left out entirely.
Placing items
- Item pages: each item has its own page, with the buy box after the content.
- List page:
/where-to-buy/lists all your items, and/where-to-buy/category/name/lists a category. - In posts and pages: add the Where to Buy block, choose the item, and choose whether to show the photo and description too or just the buttons.
Or use a shortcode:
[where_to_buy id="12"] | The item as a card: photo, title, short description and buttons. Use slug="item-name" instead of id if you prefer. |
|---|---|
[where_to_buy id="12" show="buttons"] | Just the buy box. |
[where_to_buy_buttons] | The buy box for the item being shown, for theme templates. |
[where_to_buy_list] | A grid of item cards. Options: category="slug", count="6", orderby="title", order="ASC", buttons="0" to leave out the buttons. |
Disclosures
Whenever buttons show, your disclosure note shows right under them, followed by the extra disclosure of each store whose button is showing. Store links carry rel="sponsored nofollow noopener", which is how Google asks for affiliate links to be marked.
If you're in the Amazon Associates program, keep Amazon's extra disclosure: Amazon requires that exact sentence wherever its links appear.
Affiliate Link Cloaker
With Affiliate Link Cloaker active, each store row in the item editor also has a use cloaked link menu. Choose one of your cloaked links and it's used instead of the pasted link:
- the button goes to the cloaked
/go/address, and the click is counted with the item's name as the sub-ID, - the store's domain check applies to where the cloaked link ends up,
- if the cloaker marks the offer as paused, banned or ended, the button is hidden.
Your affiliate tag isn't added to cloaked links; put it in the cloaked link's destination instead.
Theme templates
Page builders and block themes can lay out item pages themselves. Items are a post type called wtb_item, so create a template for single wtb_item posts, and one for its archive for the list page. In the template:
- use the featured image, title and excerpt (the short description) as usual,
- place
[where_to_buy_buttons]where the buttons should go. In a list or loop, pass the item:[where_to_buy_buttons id="…"], - untick Add the buy box after the content in General Settings, so the buttons don't appear twice.
Styling
The buy box and cards use their own small stylesheet, which picks up Automatic.css colours when your site has them. To restyle, override these CSS variables on .wtb-box or .wtb-item:
--wtb-ink, --wtb-muted, --wtb-accent, --wtb-accent-ink,
--wtb-surface, --wtb-line, --wtb-radius, --wtb-button-height
Classes: .wtb-box, .wtb-box__heading, .wtb-box__stores, .wtb-store (with --image, --default, --text and --{store-id}), .wtb-box__note, .wtb-item, .wtb-item__photo, .wtb-item__title, .wtb-item__desc and .wtb-items.
For developers
| REST | Items are at /wp-json/wp/v2/wtb_item, with a read-only wtb_buttons field listing the buttons that show (store, name, url, image). |
|---|---|
wtb_buttons | Filter the buttons for an item: ( $buttons, $item_id ). |
wtb_box_html, wtb_card_html | Filter the buy box and card markup: ( $html, $item_id ). |
wtb_item_slug | Filter the URL slug. |
wtb_normalize_store_url | Filter a store link as an item is saved: ( $url, $pasted_url, $store ). Return $pasted_url to keep links exactly as pasted. |
wtb_resolve_amazon_short_links | Return false to leave amzn.to and a.co links unshortened instead of following them. |
wtb_item_block_editor | Return true to edit items in the block editor instead of the classic screen. |
Updating
Download the new zip, go to Plugins → Add New → Upload Plugin, choose it, and click Replace current with uploaded. Your items and settings are kept, and anything that needs moving is moved on the first page load.
Uninstalling
Deactivating keeps everything. Deleting the plugin keeps your items and settings too, unless you ticked Delete all items, their categories and these settings in General Settings first.